This is the final post in my series on the basics of The Exposure Triangle. So far in this series, I have discussed the basics of what The Exposure Triangle is, and two of the three points of the triangle, ISO and Aperture. All that leaves is the final point to the triangle, the Shutter Speed.
Shutter Speed
Shutter speed controls just what it’s called, the speed at which the shutter is open on your camera. Just like ISO and Aperture, the Shutter Speed can be used to control the amount of light that enters the lens and ultimately hits the camera’s sensor, but also like the other settings, this one has it’s own special effects that can be achieved through its proper use.
Shutter speed is measured in seconds, or fractions of a second. The bigger the denominator the faster the shutter speed. 1/1000 is much faster than 1/60.
While hand holding your camera, you will probably be using a shutter speed of 1/60 or higher to capture your images. Speeds slower than that will usually introduce “camera shake” into your images and will start making things look blurry.
Speeds slower than 1/60 will require the use of a tripod or some other instrument to hold the camera for you. As technology improves, cameras are being released with better image stabilization which will allow for slower speeds while still holding the camera.
Shutter speeds you will find on your camera will usually double with each setting. You will probably have some, all, or more of the following shutter speeds available to use on your camera – 1/1000, 1/500, 1/250, 1/125, 1/60, 1/30, 1/15, 1/8, 1/4 etc. Each setting shown here is considered a “stop” and the increase or reduction in this setting will require you to increase (or decrease) one of the other settings by a “stop” as well.
For example, let’s say you have the proper exposure for an image at ISO 400, 1/250, and f/8, but you want to introduce a bit of motion into your image. You will need to first lower your shutter speed (to introduce the motion to your image) and then you will need to decide if you wish to change the ISO or the aperture. If you were to change your shutter speed to a slower speed of 1/30, you will need to adjust another setting, aperture for example, open it up 4 “stops” to f/5, to keep the image’s proper exposure.
Some cameras may even give you the option for a very slow shutter speed that are not in the fractions, but whole seconds or higher. You may be able to set your camera to keep its shutter open for 1, 10, or even up to 30 seconds. These slower speeds are good for very low light conditions or if you wish to capture a lot of motion in your shots. Some cameras also provide you with an option called “Bulb” or just “B”. This setting allows the shutter to be open for as long as the shutter button is pressed.
Capture Motion
Normally when we think of photos, we think of capturing a split second of time to create the complete photo. But sometimes it may be necessary to create a sense of motion to convey the bigger picture. For example, if you were taking a photo of a race car, you may want to give it a sense of motion, or the speed of water flow over a waterfall or a river.
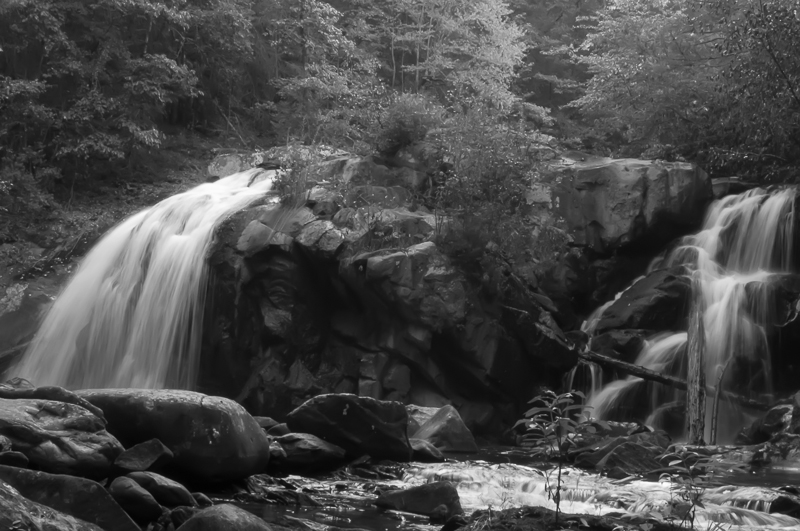
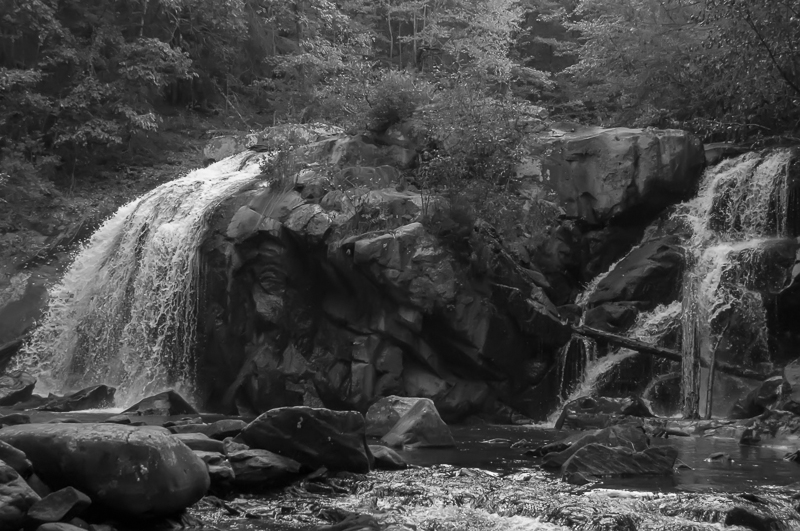
Below are two images that are were used to illustrate the effects of shutter speed on a shot of a waterfall. The images were taken a while ago, while on a hiking trip to Turtletown falls, located in the Cherokee National Forest in East Tennessee. The first image was shot with a shutter speed of 1/6 of a second. Looking at this image, you can see the slow speed creates an effect of silk flowing over the falls. The second image is of the same falls, but at a quicker speed. Looking at the second image, you can see the camera was able to capture the individual droplets of water was they flow over the falls.

This shot was taken using a NIKON D5000 at ISO 1000, f/25, for 1/6sec

This shot was taken using a NIKON D5000 at ISO 1000, f/5, for 1/400sec