This is a continuation of a series of posts that I have been writing to help those that are new to photography to learn about the basic settings of their camera. Through these posts I hope to teach you the basic information on how the settings within your camera help to create the best exposure you can achieve. This Exposure Triangle series was created to provide you with information about the ISO, Aperture, and Shutter Speed settings and the effects that each setting has on your images.
What is Aperture?
Aperture is the size of the hole that allows light through the lens at the moment the picture is taken. Aperture is also known as F-Stop. The words aperture and f-stop are commonly used interchangeably.
When discussing aperture, it can become confusing with all the numbers and what they actually mean. Aperture is measured by the F-Scale, which can look like: f4, f5.6, f8, f11, and f16. Some lenses will have a larger range of stops, but these examples can be found on just about any lens available today. This is were things really start to get confusing. The way the numbers on the F-scale work is the larger the number, the smaller the hole for the light to travel through. Changing from one f-stop to the next doubles (or halves) the size of the opening in your lens, thus modifying the amount of light getting through. One thing that photographers have to keep in mind is that a change in shutter speed from one stop to the next also doubles (or halves) the amount of light let in for the photo.
Depth of Field
The amount of light that enters the lens controls the depth of field of the image. This translates to how blurry (or focused) the foreground and/or background are when you take your photo. The photos below illustrate depth of field. The first image was taken with a large aperture and you can see that items in the foreground and background are all in focus. The second and last image were taken at smaller apertures and you can see the effect of the smaller aperture causes the depth of field to become shorter, causing the figure in the background to become out of focus.
Aperture – f/18 — ISO 200, f/18, for 1/1sec

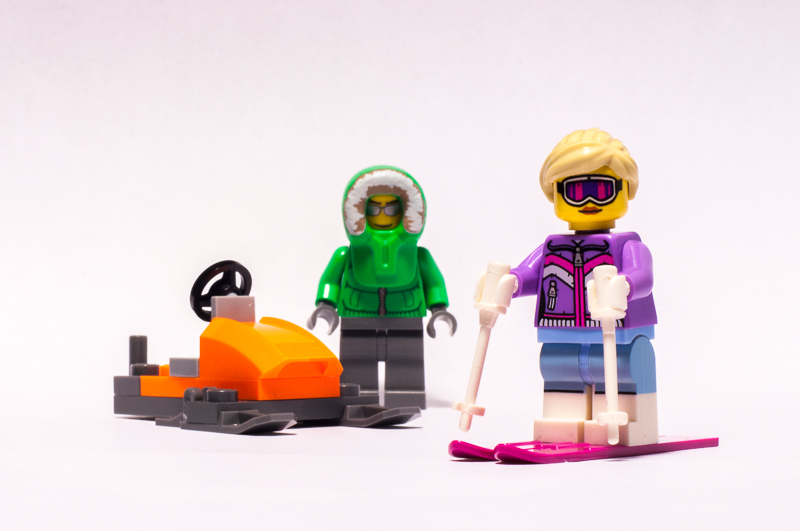
Aperture – f/10 — ISO 200, f/10, for 1/4sec
With the aperture set at f/10, you can see that the skier stays in focus, and the front of the snowmobile is also in focus. We start to see the back of the snowmobile fall out of focus and the driver is even more out of focus.

Aperture – f/2.5 — ISO 200, f/2.5, for 1/60sec
In the final image we see that the depth of field is so small that the skier’s body is in focus, but the tips of the skies and the pole in her left hand fall out of focus.
Remember, the smaller the number the smaller amount of space that will fall into the depth of field.
As you adjust the aperture, you will also need to adjust the shutter speed (which will be the next topic I write about), and/or the ISO to achieve the desired exposure you want for the image you are making. All of the settings within the Exposure Triangle work together to create the optimal exposure. These posts are geared to help you learn more about what each setting is all about, and in the future I will write about tying all these pieces together to create the best exposure.