http://youtu.be/mcvBTJjhBwo
Have you ever wanted to create a time lapse video and thought to yourself that you don’t have the time or energy to put forth the effort to create such a daunting project?
I did, and then I found a simple plug-in that makes creating a time lapse video as easy as 1, 2, 3.
Thanks to a free plug-in that I found, created by Sean McCormack. What makes this so easy? There is no need to export or resize your images. I would recommend that you read Sean’s article and download his plug-in.
Prior to using Lightroom to create your time lapse, you will first need to go out and spend some time collecting your shots. On my Nikon D5000, I am able to enter time interval mode and set the camera up on a tripod, set the interval timer and just hang out for a while and let the camera do all the work.
The example above is taken from my front yard. I setup the camera to snap an image every 5 seconds. I let the camera continue to snap images for approximately 20 minutes.
Once you have gotten your images, it’s time to import them into Lightroom and get to work by following these three simple steps:
1. Create a Collection
This step may not be necessary, but it will make things easier. Just select all your images that you wish to add to your time lapse and add them to a new collection.

2. Open the Slideshow Module
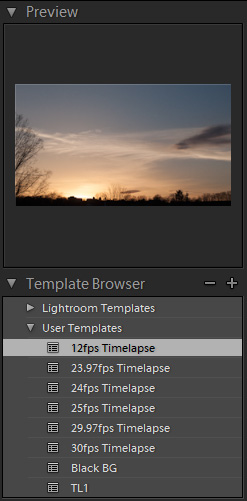
Next, you will need to open the Slideshow module and select the preset from the User Templates on the left side of the screen. You can select from different “frame per second” speeds. There are a few to choose from, and some are at some weird values, but I’m sure they are there to solve specific problems. I just have not had a time where I needed to use a 23.97fps speed. But play around with them. I have actually modified one of the templates to create a slower 12fps template that I used for the time lapse created for this post.
There are several things in this module that you may find helpful. First, you have the option to preview your time lapse by clicking on the Preview button in the bottom right. This is helpful in trying to determine which speed of template you wish to use. Second, if you find that your images are not appearing properly, there is a check box in the upper right named “Zoom to Fill Frame”, uncheck it and your images should appear properly in the preview window.
3. Export
Finally, you will need to export your video, by clicking on the “Export Video…” button in the bottom right of Lightroom. You will now be asked where you want to save it.
![]() That’s it! You’ve created your own time lapse and you now know how simple it really is, with the help of Lightroom.
That’s it! You’ve created your own time lapse and you now know how simple it really is, with the help of Lightroom.